Showing posts with label lunch. Show all posts

Wednesday, September 26, 2012

Drop Biscuits {gluten, dairy and egg-free}

Pin It
Biscuits - Oh yeah!  I love biscuits and had missed them for so long.  That's why I'm so happy to share this easy gluten-free biscuit recipe with you.  Back in the day, ya know, before we realized my daughter couldn't eat gluten, dairy or eggs, we used to make biscuits on Sunday mornings with our handy Jiffy All-Purpose Baking Mix.  Even setting aside allergies, I'm so glad we makes these from scratch now since those mixes have ingredients that no one should eat.  Can you say 'partially hydrogenated oil'?  Anyway, these drop biscuits are quite versatile.  They can be enjoyed for breakfast topped with jam, honey or coconut butter.  How about biscuits and sausage with gravy.  They are just perfect at dinnertime alongside a steaming bowl of creamy potato soup.   You could even make a sandwich on one of these.  The possibilities are endless!  And since these are drop biscuits you get to skip the mess and work of rolling out dough.  Just mix, plop, bake and eat.  Give 'em a try.  I think you'll love 'em!

Drop Biscuits {gluten, dairy, egg-free}

1 1/2 cups millet flour (sorghum works too, but millet gives them a wonderfully sweet, light flavor)
1/2 cup potato starch (tapioca starch works too)
1/2 tsp salt
2 tsp baking powder
1 tsp xanthan gum
1/4 cup sugar
1 TBSP ground flaxseed meal
1/3 cup oil
1 - 1 1/4 cup dairy-free milk (I use almond milk)

In a large mixing bowl, whisk together dry ingredients (millet flour, potato starch, salt, baking powder, xanthan gum, sugar and flaxseed).  Add in oil.  Add in 1 cup milk and stir, checking consistency.  If batter is a bit dry or thick, add up to 1/4 cup more milk.  Mix by hand until you have a nice thick (but not too thick) consistency.  Using a large mixing spoon, drop dough onto non-stick baking sheet (or a baking sheet lined with a silicone baking mat).  This yields about 8-9 good sized biscuits.  Bake at 450 for 12-15 minutes.

This recipe is being shared at Better Mom MondayMelt in Your Mouth MondayInspire Me Monday, Gluten Free MondayThis Week's CravingsMake Your Own MondaySlightly Indulgent TuesdayFat TuesdayTraditional TuesdaysAllergy Free WednesdayHealthy 2day WednesdayGluten Free WednesdayWhat's Cooking WednesdayCast Party Wednesday, Real Food WednesdayWednesday Fresh FoodsFull Plate ThursdayDelightfully Inspired ThursdayFrugal Food ThursdayPennywise Platter ThursdayGluten Free FridayFoodie FridayFresh Bites FridayFoodtastic Friday

Wednesday, August 15, 2012

Honey Mustard Chicken Salad {gluten, dairy and egg-free}

Pin It
This is a quick and easy allergy-friendly summertime dinner.  Toss together a beautiful garden salad.  Bake some chicken with a two-ingredient sauce and mix up a bit of homemade dressing.  Voila!  Sound easy enough?  Yes.  Sound yummy enough?  Oh, yeah!  Although I serve this for dinner, it could also make a lovely lunch.

Honey Mustard Chicken Salad
{gluten, dairy and egg-free}

2-3 boneless, skinless chicken breasts
1/4 cup honey
1/4 cup mustard (I like to use Dijon)

Honey Mustard Dressing (from food.com):
3 TBSP honey
2 TBSP mustard (I like to use Dijon)
1/4 cup apple cider vinegar
1/2 cup olive oil

Garden Salad ingredients such as:
various greens such as romaine and/or spinach
sliced mushrooms
tomatoes
carrots
radishes
diced onion
etc

Step 1:  Slice chicken breasts lengthwise so that you have two thin filets from each breast.  Pre-heat oven to 375.  Spread chicken in a baking dish (9x13 inch glass dish is what I use).  Mix 1/4 cup honey with 1/4 cup mustard and spread this over chicken to coat.  Bake chicken at 375 for 30-40 minutes, or until chicken is cooked through.

Step 2:  Make the honey mustard salad dressing by combining the honey, mustard, vinegar and oil in the amounts listed above.  Set aside.

Step 3:  Assemble a beautiful garden salad.  Include your favorite ingredients such as romaine lettuce and baby spinach, mushrooms, tomatoes, carrots or any other salad favorites.  Set aside.

Step 4:  Once the chicken has finished cooking, cut it into bite-size pieces.  You can choose to toss the chicken into the salad or keep it in a separate dish for individuals to add to their salad on their own plates.  Serve with the honey mustard dressing either on the side (my preference) or tossed into the salad.

This recipe is being shared at Melt in Your Mouth MondayBetter Mom MondayMonday ManiaSlightly Indulgent TuesdayReal Food WednesdayHealth 2day WednesdayWhat's Cooking WednesdayWednesday Fresh FoodsCast Party WednesdayThriving on ThursdaysFull Plate ThursdayDelightfully Inspiring ThursdayPennywise PlatterGluten Free FridayFoodtastic FridayFriday's FavoritesAllergy Friendly Friday

Wednesday, July 11, 2012

Pasta Salad {gluten, dairy and egg-free}

Pin It
Pasta Salad, the quintessential summertime dish, can in fact be made gluten-free!  I had been a bit hesitant to try it with gluten-free noodles, but now that I've found a brand we like, its all good.  Keep in mind that pasta salad is one of those things that can handle a wide variety of add-ins.  This recipe will get you started with flavors and proportions, but please add or subtract any ingredients you'd like.

Pasta Salad {gluten, dairy and egg-free}

12 oz box of gluten-free noodles (I prefer Schar.)
1/2 cup finely diced vidalia onion
1 can black olives, sliced
A handful or two of cherry tomatoes, halved
1-2 (15 oz) cans of beans such as kidney and/or black beans
1 red bell pepper, diced
1 3.5 oz package pepperoni, slices halved (Apparently Hormel's lactic acid starter culture is not from dairy since their label states "no allergens present".  I believe Boar's Head pepperoni is okay too (read this post for more info).)

Dressing:
1/2 cup olive oil
1/4 cup lime juice
2 large cloves garlic, dice or squeeze through your garlic press
2 TBSP fresh basil (or 2 tsp dried basil)
1 TBSP fresh oregano (or 1 tsp dried oregano)
1 tsp sugar
1/2 tsp salt
1/4 tsp pepper

Cook gluten-free noodles according to package instructions.  Drain and set aside to cool.  Meanwhile, chop up all your wonderful add-ins.  In a large mixing bowl or your prettiest serving bowl, toss together cooked noodles and chopped add-ins.  Next, mix up the dressing.  I like to put it in a jar with a lid so I can thoroughly shake it all up.  Pour dressing over noodle mix and toss to evenly coat.  Chill in the fridge for several hours or overnight.

This recipe is being shared at Allergy Free WednesdayGluten Free WednesdaysUltimate Recipe Swap

Monday, July 9, 2012

Beach Vacation Meal Plan: What To Eat While Traveling - July 9, 2012

Pin It
As anyone with food allergies knows, travel can be a challenge.  But as with most things, it can be done!  It does take some prep-work and advanced planning so I thought I'd share how my family handled food on our recent week-long trip to the beach. 

The first thing we always do is rent a condo or house that has a kitchen.  That way we can be in control of our meals and do much of the food prep ourselves. 

The second thing we do is a little internet research to see if there are any allergy-friendly restaurants in the area we'll be visiting.  One helpful site is AllergyEats.com.  Visit the site, choose the foods you avoid and the location you'll be visiting and it will give you a list of restaurants with links to menus as well as reviews.  Other helpful sites include Find Me Gluten FreeLife Without Gluten's Restaurant FinderGluten Free Registry and Celiac Restaurant Guide.  (I'm sure there are others.)  Finding a restaurant that is conscious of gluten intolerance is at least a start to finding one that accommodates other allergies.

Third, we make a detailed meal plan including what we'll eat for breakfast, lunch and dinner each day.  On this list, we'll include at least a few meals that we'll eat out at a restaurant (provided we found some leads on the above mentioned websites.)  Since no one wants to spend much time in the kitchen while one vacation, we make sure our meals are quick, easy and mostly prepped ahead of time.  Dinners such as Mrs. Jolly's Chicken CasseroleCreamy Chicken PieSeasoned Ground Beef and RiceItalian Sausage Rice Bowl, Pulled BBQ Chicken or even Homemade Allergy-Friendly Pizza can be fully prepared at home, frozen in a baking dish or zip-close bag and taken along in your cooler to your destination.  During your vacation, its quick and easy to let one of those ready-made meals bake in the oven while you shower off the sand and, voila!, dinner's ready. (Just make sure you plan out your meals so there's time to defrost things in the fridge before cooking time.) Other ideas include meals that require few ingredients and little time in the kitchen such as spaghetti and meat sauce, hamburgers or taco salad.


You may also want to prep some take-along lunches so everyone doesn't get burnt out on sandwiches.  I'll give you a few ideas below.  Speaking of sandwiches, now might be a good time to buy store-bought GF bread instead of making your own Awesome Sandwich Bread.  You don't want vacation prep to wear you out completely.

Lastly, we make a grocery list of things to buy when we get there.  I prefer to do most of my shopping at home and bring it along. (Who wants to do a full-out grocery run while on vacation!)  But there do seem to be those last minute or freezer items that are just better purchased close to your destination.  But I do recommend bringing from home those specialty items like soy yogurt or gluten-free bread that may be hard to find at a standard grocery store.

So here's the actual plan we followed for our recent beach trip. 


Monday
Tuesday
  • Breakfast: Gluten-Free English Muffins (I adapted this recipe from Tessa the Domestic Diva, made them at home and froze them for easy toasting later.)
  • Lunch:  Cold Cut Sandwiches, grapes and potato chips
  • Dinner:  Out at a restaurant
Wednesday
  • Breakfast:  Homemade GF Granola Cereal similar to this recipe found at Crockpot 365
  • Lunch:  Taco Burger (Ahead of time, brown some ground beef with taco seasoning. Serve on the beach in sandwich bags with a spoon.) and Fritos and apples
  • Dinner:  Salad Dressing Chicken, Ore-Ida Fries (label states "gluten-free") and Salad
Thursday
  • Breakfast:  Gluten-Free English Muffins
  • Lunch:  Chef Salads (Served on the beach in individual take-n-toss containers. Don't forget the forks!)
  • Dinner:  Out at a restaurant
Friday
  • Breakfast:  Banana Bread (I made 2 loaves at home, sliced and froze for easy toasting.)
  • Lunch:  Summertime Chicken Salad, fruit cups and chips/crackers
  • Dinner:  Pulled BBQ Chicken (We made this in the crockpot while we swam in the sea, but this is also an easy one to make at home, freeze and take along.)
Saturday
  • Breakfast:  Cinnamon Toast
  • Lunch on the road:  Cold Cut Sandwiches and snacks
  • Dinner on the road:  Restaurant  
So that's it. That's how we do it.  I'd love to hear how others handle meals while traveling so please share your ideas with us.  


Check out more meal plan ideas at Menu Plan Monday and Gluten Free Menu Swap.

Thursday, July 5, 2012

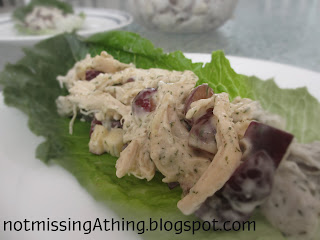
Summertime Chicken Salad {gluten, dairy and egg-free}

Pin It
This classic summertime dish is a favorite of mine.  It makes me smile come dinner time when I open the fridge and see it in there, just waiting for me - the preparation already completed earlier in the day.  A cool and refreshing meal at the end of a hot summer day. This also makes a great lunch that can be packed in a cooler bag and taken along to work or school.  And now those with egg allergies can enjoy it too, thanks to the tasty eggless mayo options available.  I use to use Vegenaise but I recently found an option I like much better - Spectrum Eggless-Vegan Light Canola Mayo.  If you enjoy chicken salad, go ahead and cook  enough chicken for several batches.  Shred or dice it all and freeze the extra in batch sizes so the next time you want to make chicken salad, you won't have to turn your oven on (yay!).

Summertime Chicken Salad {gluten, dairy and egg-free}

3 large chicken breasts (yields about 3-4 cups of cooked, shredded chicken)
1 cup grapes, halved
1 cup apples, diced
1 cup mayonaise (for egg-free use Spectrum Eggless-Vegan Light Canola Mayo or Vegenaise)
1 TBSP vinegar
1 TBSP sugar (optional)
1 tsp dill
1/4 tsp nutmeg
1 tsp salt
1/4 - 1/2 tsp pepper
Step 1 - Bake chicken breasts at 375 for about 30 minutes, or until cooked through.  Once cooked, shred chicken by using two forks to pull the meat apart.  If you prefer, you can dice the chicken instead of shred it.
Step 2 - Cut the apple and the grapes.
Step 3 - In mixing bowl, whisk together mayo, vinegar, sugar, and seasonings.  Set aside.
Step 4 - Toss the chicken, apples, grapes and sauce together until well combined.  Refrigerate until ready to serve.  Oh, and be sure to serve it in your prettiest serving dish.
Serve on its own, wrapped in a romaine lettuce leaf, or in a gluten-free tortilla wrap.
NOTE:  This is always best the second day, so its a great make-ahead dish.


Thursday, April 19, 2012

Awesome Sandwich Bread {gluten, dairy and egg-free}

Pin It I got tired of serving my daughter dry and crumbly store-bought gluten-free bread devoid of any nutritional value.  In all fairness, there are some not-so-bad options on the store shelves, but they are pretty pricey and many of them contain egg.  So I decided to tackle homemade gluten-free, dairy-free, egg-free bread and guess what?  Success!  I started with this recipe from The Wacky Waffle which is written by a friend of a friend.

But homemade bread?  Isn't that hard to make?  Doesn't that take a lot of time?  The answer, my friends, to both questions is 'no'.  Homemade gluten-free bread is not hard to make and it doesn't take a lot of time.  In fact, gluten-free bread is quicker and easier to make than wheat bread because you don't have to knead it and you only have to let it rise once.  This recipe, from start to finish, will only take about hours, and of that time, only about 15 minutes is you actually working.  In case you just don't have hours, this recipe can be made in a bread machine (though I think it turns out best when you make it the old-fashioned way)!

Take a look at the ingredients below and you'll see this is primarily a whole-grain recipe - so it's good for you.  And it tastes good, doesn't crumble and stays fresh in the fridge for at least 5 days!  It can also be stored in the freezer, sliced and ready for toasting.  

After reading through the simplified instructions, please read the "additional notes" section and the bread machine instructions below the recipe for more details.  Please try this bread!  Then come back and tell us how it turned out for you.  I think you'll be surprised at how easy it is to make and how tasty it is to eat.

Awesome Sandwich Bread {gluten, dairy and egg-free} 

1 ½ cups sorghum flour
½ cup buckwheat flour 
1 cup potato or tapioca starch
2 tsp xanthan gum
2 tsp salt
¼ cup ground flaxseed meal
1 TBSP yeast (*don’t add yeast yet if using the delay setting on a bread maker)
¼ cup oil
¼ cup honey
1 ¾ cups warm almond milk (heat about 1 minute in microwave)
1 tsp mild-tasting vinegar (distilled white or apple cider vinegar)

Whisk together dry ingredients (flours, xanthan gum, salt, and ground flaxseed).  Add yeast to dry ingredients unless using the delay setting on a bread maker.  In a separate bowl, mix together wet ingredients (oil, honey, milk and vinegar).  Add dry mix into the wet mix.  Combine thoroughly using the dough hooks on a stand mixer.  This dough is a bit too thick for regular beaters as it gets a little crazy, walking up the beaters.  You’ll know you have the right consistency if your dough is too wet to knead but too thick to pour.  Its kind of like a thick drop biscuit dough.  Transfer dough into glass loaf pan (no need to grease your pan) and let rise for 30 minutes.  Loaf should almost double in size, or be about even with the top of your loaf pan.  Bake in a pre-heated 375 degree oven for 40 minutes.  Your loaf should have a nice medium-brown crust.  Allow bread to cool in the pan until cool enough to remove; then pop bread out of pan by running a butter knife around the edges. Let bread finish cooling on a wire rack. (This prevents the bottom from getting damp.)  Once cool, slice and enjoy or freeze for later! 

Additional Notes: 

Rising:  Here’s my preferred rising method:  Pour boiling water into an oven-safe casserole dish or spare loaf pan and place in the oven.  Then place your loaf in the oven, shut the door and let it rise.  Stick a note on your oven controls to remind yourself not to turn the oven on while your dough is rising.  Oh – maybe that step is just for scattered people such as myself.

Baking:  Leave the above mentioned hot water in the oven during the baking.  This seems to help the bread retain its moisture. 

Ingredients:  Don’t leave out the vinegar!  It really helps with the rise.  Also, if you don't have buckwheat flour, you can replace it with sorghum so that your flour mix would be 2 cups sorghum flour and 1 cup potato or tapioca starch.  I like it best with the buckwheat - I think it improves the texture.

Storage:  This bread stays fresh for at least 5 days stored it in a zip-close plastic bag in the fridge, unsliced.  For longer storage, slice the loaf and store in a zip-close freezer bag in the freezer.  When its time for breakfast toast or a sandwich, simply pop your slices in the toaster and they’re ready to be enjoyed.

Bread Machine Instructions:
This bread can also be made in a bread machine!  Don’t fret if your bread machine doesn’t have a gluten-free cycle.  I have a low-end machine  without a gluten-free cycle and, although I imagine a better machine might produce better results, it gets the job done.  My machine requires that I help it along by scraping around the corners during the mixing cycle – sad, but true.  I've got my eye on this one but I'd love recommendations if you have a machine you like.

In a large mixing bowl, whisk together all your dry ingredients (flours, xanthan gum, salt, and ground flaxseed).  Whisk yeast into dry ingredients unless you are using the delay setting.  If using a delay setting,  you'll add the yeast last -on top of the dry mixture so it doesn't get wet prematurely.  Set aside.

In a separate bowl, whisk together all the wet ingredients (oil, honey, milk and vinegar). Transfer to bread machine.

Into your bread machine, add dry ingredient mixture on top of wet ingredients.  If using delay setting, make a little valley in the flour mixture to hold the yeast there on top of the dry ingredients.

Set your bread machine for a 2 lb loaf and let your machine do the rest.  If you do have a gluten-free cycle, use it.

This recipe is being shared at Homemade Bread ChallengePotluck Party